WJBzone '92 Miata
Project
My latest project.
I always liked a Miata, but was never serious about getting one until:
3-3-05
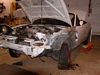
I found this 1992 Miata online at TTRepairables.com (in Indiana).


In inspecting the car, I found it needs at least:
Front Bumper assembly
Left Fender
Left Headlight
The hood can be repaired.
also the top eventually replaced. (it has a big patch)
I started and drove it around the lot. Sounded good. Only had 33,000 miles on it. I verified the milage and title information with carfax.com
I checked on replacement parts and estimated that I could get them for around $800.(not counting a top or paint). I used car-part.com to find used parts.
3-12 Saturday
I bought the car for $2400 (salvage title)
Will need to get an out of state inspection.
I've done very little body work, but I work at a machine shop where one of the guy's that does this is helping me out (Thanks Robby).
Towed the car home with the back wheels on a dolly.
I am suprised at all the features this little car has:
-Power Steering
-Air conditioning
-AM/FM cassette. There are speakers in the seat headrests.
-Power antenna.
-Power windows.
-5 speed manual transmission.
-Cruise Control
-Clifford alarm system (I need to find out if this is working)
I don't know if it has ABS or limited slip differential.
I couldn't resist taking the car for a quick spin around the block before pulling it into the garage. Got it up to about 50 mph. It ran and handled great!
It did not come with an owners manual. I looked up what I could online. There is a ton of information.
miata.net is a great starting place.
Now I'm excited about getting it restored!
3-14 Monday.
I have a friend that works for a Auto dealer, so I was able to get new parts for about the same price that I would have paid for the used ones (when I add the shipping on the used parts). I spent a total $837 and got the bumper, fender, headlight assy, and a new original battary. (Thank you, Tim)
3-18 Friday
Picked up the parts.
3-19 Saturday
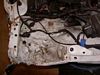
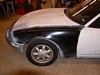
Got a good look at the damage.
- Click pictures to enlarge
- Hit your F5 key to restore thumbnails
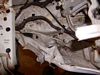
After working on the side with a winch and some big clamps I got it shaped a little better:
4-9 Saturday
Worked as I had time for the last couple of weeks.
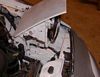
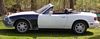
After a dozen times of test fitting the fender,bumper,hood and headlight assy and re-bending the radiator shroud, it seemed to fit as good as I can get.
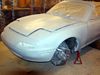
I painted (primer / basecoat) the headlight assy and the edges of the fender and bumper before the final bolt together.
Here you can see the sheet metal is still wrinkeled under the headlight assembly. It does not look to bad painted, considering what I started with.
The car is ready to primer. I need to set up my paint booth.
4-16 Friday. - Removing Trim
I thought I had removed everything that I could without a lot of trouble, but after posting a question on the miata forum, I found it is easy to remove some trim parts. (thanks W)
The windshield washer nozzles on the hood can be removed using a thin needle nose. Press in the "V" under the hood and push out. The V is front to back (not side to side). You could also use a small flat screwdriver pushing one side of the V at a time.
Got this tip from njaremka on miataforums:
Get yourself a deep 10mm socket, and stick it up from the underside of the hood around the nozzle. It is just the right size, and the nozzle will just pop right out.

The door window trim can be removed by pulling out the buttons on each end. Raise the outer edge high enough to use a screwdriver to push straignt in on the clip. Then pull up.
I thought I was going to deform the strip by pulling up, but the metal strip in it is pliable enough to flex and then re-straighten.

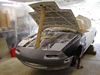
The roof trim strip in the back takes some time. This might be a good time to replace the roof if you were going to do that.
1. Pull out the plastic (fuzzy) retainers holding the carpet in the back.
2. Remove the �12 bolts under the back window that hold the metal retaining strip to clamp the roof. Remove all the sections of this retainer strip.
3. Then pull the cloth roof from the bolts. Be careful not to damage the vinyl.
4. Unbolt the trim strip from inside. 12 more bolts.
5. Slide the trim strip off toward the inside. The mild adhesive is easy to pull apart.
I cleaned off the adhesive from the paint using a plastic trowel to get the big chunks. Some popsicle sticks (I keep a box of them around for cases like this) help to remove smaller chunks. Then the rest came off easily with papertowels and Acetone.

The mirrors are easy (these are non-power mirrors). Pop out the plastic base using a cloth covered screwdriver. Pry in the slot on the underneath side. Two screws and it's off.

Now I am ready to start painting. (after a little more sanding).
4-18 Sunday
Got my paint booth setup in the barn. I bought a $30 roll of 10 mil plastic from Mendelsons liquidation outlet in Dayton. I also got a face mask there for $15.
(Its another story, but you should see this hardware outlet store. It's like a museum)
Started the taping.
4-20 Wed
Took off the door handles. Not a bad job after getting these instructions from miataforums (W).
- Roll window down
- Remove arm rest with philips head screwdriver (three philips head bolts, one is covered).
- Remove door handle trim with small philips head (one small philips head bolt).
- Pop off speaker cover by hand at the clip points.
- Pop off door panel by hand at the clip points.
- Roll up the window.
- Peel away plastic inside cover by hand.
- Unbolt two nuts that hold outside door handle in place with a ratchet and a generous extension. (10mm)
- From the inside at the bottom of the rod from the door handle and lock, unfasten the plastic clip that is fastened around the threaded part of the rod. Use a long flat screwdriver through the top-back hole. Catch the tang on the clip and it pops open without a lot of force. (You might want to note how far the threaded rod extends below the clip for re-assembly)
- From the outside, unclip the ring that holds the lock in place with a small thin pick.
- Pull the lock and handle out
- Fasten the clip that was holding the bottom of the rod to something so that it doesn't get crushed/bent when you roll the window down. I used a zip tie.
- Learn how to open the door from outside without the door handle so you don't lock yourself out of the car. I can get it by hand by pushing down on the lever.
- Put the arm rest back on so you can easily close the door.
4-23 Saturday
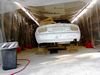
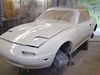
Sprayed the primer. Used one quart to cover entire car. 4:1 mix with hardener and then 1 part reducer. Looks better now that its all one color.
5-8 Saturday
I finally got a good day to paint. Rain and cold weather were holding me up.
The paint wanted to fisheye on me when I applied very much at at time. (little crater looking spots where the paint was not sticking to the primer).
When I applied the paint in very light coats it worked good but took a lot longer. It took about 3 hours to get the base coat on this way, but it looked great!
I should have known there was something wrong at this time.
Saturday, I started on the clearcoat. When I sprayed the paint it was hard to see how I was doing
because of the poor lighting and I think because looking straight at the white paint is more difficult then looking from an angle. At least to see the flaws.
When I got done I could see a lot of those little crater marks in the clearcoat. I believe it is because my filter is not working properly. The filter/regulater at the compressor is old. I have a 5HP single stage Sanborn compressor with a 60 gal tank that I bought about 15 years ago. It is not used a lot, but I never have changed the filter. I did use one of those throw-away plastic filters at the gun, but something was getting through. (water/oil)
I also got some runs that I just could not see while applying the clear. I tried to keep a wet layer but there is a fine line between wet and too much. Especially on the lower parts of the bumper. My first try I figured I would have problems.
Anyway, I need to wet sand these blimishes out before applying a second coat of clear. I also have some orange peal, but that's minimal.
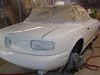
Here are pics of the clearcoat with the blimishes. It actually looks good from a distance, but up close, it needs some work
Sunday I wetsanded it down fairly smooth. Took about 4 hours, but I got out all the runs and craters. This clearcoat is tough. 1500 grit paper takes some work.
A couple of the runs were in a curved area that was diffult to sand evenly. I broke through the color into the primer. I used an airbrush to re-apply the color to these spots. I also used the airbrush for the mirrors.
I also bought a new filter to mount at the compressor and an extra line filter in addition to the throw-away.
Now I need to wash down the mess from wet sanding and apply a second coat of clear.